

The concept behind primitive objects (in short, primitives) is to give you the possibility to create simple scenes easily. Large amounts of primitives can also be rendered very efficiently. Defining an object in Ultimate 3D works in the following way. As I already said, every object in Ultimate 3D must be represented by an instance of an object in Game Maker. So you have to create a new object first. Then you've got to define a couple of variables for the object. Finally you call a function that passes the values of the variables to Ultimate 3D and creates the object. So let's get started with the first visible object.
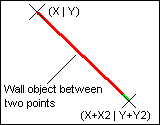
A wall object is totally flat and orientated vertically. Before creating it you have to set the following variables:
height
This variable indicates the height of the wall.
x2, y2
These two variables indicate where the wall goes to from its x- and y-position. The following graphic illustrates this:
texture
You should set this variable to one of the indices you assigned a texture to when using the function LoadTexture(...). This texture will then be used for the wall. If you do not want to use a texture you can set this variable to -1.
texx1, texy1, texx2, texy2 (optional)
These variables are optional. If you do not set these variables then the whole texture will be used. They define two so-called texture coordinates. The texture coordinates x=0 and y=0 (in short (0|0)) refer to the top left of a texture. The texture coordinates (0.5|0.5) refer to the middle of a texture, the texture coordinates (0|1) to the bottom left of a texture, the texture coordinates (1|1) to the bottom right, and so on. The wall object will use the part of the texture that lies between the two given texture coordinates. The texture coordinates can also be made up of values bigger than 1. Then the texture will be wrapped (the same as tiling but for textures).
There are two additional variables but currently you do not need to know about them. Floor and cube primitives have them, too. They are described in the tutorial Adding lights.
Now that you have set up all required variables you can call CreateWall() once. This function does not take any parameters. It gets all the information it needs from the variables. However, you have to put Step() into the step event of the object and Destroy() into its destroy event. Neither of them require any parameters. Destroy() has to be put into the destroy event because otherwise Ultimate 3D would not know when the object gets destroyed. It simply would not disappear in this case. What Step() does is the topic of the next part of this tutorial. So hang on ;) .
Transforming... strange word. Sounds a bit complicated, does not it? Well, do not be scared, you already know how to transform something; you just do not know that it's called transforming. Transforming something means changing its orientation. If you take an object and move it around, that's a transformation. If you rotate it that's a transformation as well. There's one transformation that can not be done in real life, but you already know it from 2D stuff: scaling something. Scaling means changing the size of an object. An object can be scaled on three axes. All these processes are called transformations. So the thing you should remember is that a transformation is the combination of scaling (changing size), rotation, and translation (moving).
And now to transform primitives. You do know how to do this, because you have transformed another object before (if you read the tutorials completely so far): the camera object. Like the camera object, every primitive has the variables x, y, z, rotx, roty and rotz. Additionally, they have scalx, scaly, scalz. Since the explanation of the meaning of rotx, roty and rotz wasn't that detailed in the tutorial about camera objects, here's a more detailed one and a description of scalx, scaly and scalz.
rotx, roty, rotz
As I already said in the tutorial about camera objects, the variable rotx gives the pitch rotation of the object, the variable roty gives the yaw rotation and the variable rotz gives the roll rotation. The following graphic illustrates this.

Increasing rotx will rotate the front of the object down, while decreasing it will move the object up. The yaw rotation (roty) rotates the object without changing the z-coordinates of the points of the object. Finally there's the roll rotation. I think there's not much to say about this. Note that the roll rotation is applied first, then the pitch rotation follows and finally the yaw rotation gets applied.
A short comment on that: If you have been reading carefully, you may have noticed that roty rotates around the z-axis whereas rotz rotates around the y-axis. This little inconsistency is a remnant from the first versions of Ultimate 3D. These variables are named according to the coordinate system that's used by Ultimate 3D internally. You do not need to care about that, just keep in mind that roty rotates around the z-axis and rotz rotates around the y-axis.
scalx, scaly, scalz
The concept of scaling is quite easy to understand. A scaling value of one means that nothing changes, a scaling value of two means that everything becomes twice as big, and a scaling value of 0.5 means that everything becomes half the size. Usually you do not use negative scaling values. The only thing that's left to explain is why there are three scaling values. That's because this way you have the possibility to scale the object differently along the three axes of the 3D coordinate system. But in most cases you want to scale your object in the same way along all axes so you should set up the same value for all three scaling values. Note that scaling is done before rotation.
Another thing you must never forget is that every Ultimate 3D object must contain a call to the Step() function within its step event. Otherwise, the variables will not affect the transformation of the model!
Floor objects do not have an expansion along the z-axis, meaning that they are totally flat and horizontal. The variables you have to set up before creating floor objects are the following:
width, height
width describes the expansion of the floor object along the x-axis and height the expansion along the y-axis.
texture
Index of the texture that is to be used for this object or -1 for none. For a more detailed description have a look at the text about wall objects.
texx1, texy1, texx2, texy2 (optional)
The part of the texture that is to be used. For a more detailed description have a look at the text about wall objects.
As you can see there aren't many changes in comparison to wall objects. Again there are two additional variables that will be introduced in the tutorial about light sources. After setting up these variables you have to call CreateFloor() to initialize the floor object. And as usual you need Step() and Destroy() in the corresponding events.
Cube objects are a little bit more complex than floors and walls, but they can be used for pretty cool things. In the old demo of Ultimate 3D v. 1.31 all buildings were made up of simple cubes. As with other primitives, you have to set up a few variables before you can create a cube. Here's a list of them:
width, height, depth2
The dimensions of the cube. width gives the expansion along the x-axis, depth2 gives the expansion along the y-axis and height gives the expansion along the z-axis. depth2 is called "depth2" instead of "depth" because the variable depth is used by Game Maker.
texx1, texy1, texz1, texx2, texy2, texz2 (optional)
The part of the texture that is to be used. For a more detailed description of these parameters have a look at the text about wall objects. Since cube objects are three dimensional whereas walls are two dimensional, cube objects have three pairs of these parameters.
texture
Index of the texture that is to be used for this object or -1 for none. For a more detailed description have a look at the text about wall objects.
subdivide_texture (optional)
As everyone knows a cube has six sides. If you set this variable to false all of them will use the same part of the texture. If you set it to true the texture will be subdivided into six parts and each side of the cube will use a different part of the texture. The following graphic illustrates how this works.

When dispart_texture is false, the entire texture is displayed on each side. When it is true, each side shows only a part.
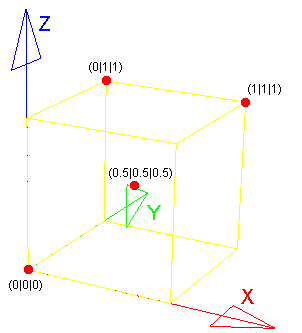
originx, originy, originz (optional)
These variables usually take values in the range from 0 to 1. They define where the origin of the cube lies. For example, entering 0.5 for all of them would mean that the origin of the cube lies exactly in the middle. Entering the correct values for these variables is very important, especially when you rotate the cube. The following graphic illustrates how it works:
After setting up these variables you have to call CreateCube() once to initialize the cube object. And as usual you need Step() and Destroy() in the corresponding events.
Billboards differ a bit from all other 3D objects. The reason is simple. They aren't 3D. It often happens that extremely complex geometry is required for particular objects. Trees are the best example. To avoid this complex geometry you can use billboards. In older games you often see that the trees are 2D while everything else is 3D. That's what billboards are. Billboards are 2D objects in 3D space. They are fixed to one point in 3D space and their size on the screen changes depending on the distance of the camera.
Anyway, the creation of billboards is not any harder than the creation of other primitive objects. Here are the variables you have to set up for them:
width, height
The dimensions of the billboard.
originx, originy
These variables define the origin of the billboard. The origin is the point of the billboard that does not change its position in 3D space when the camera rotates. Usually it's somewhere in the middle of the billboard. In principle it works in the same way as the variables originx/y/z of cube objects. So have a look at the description of those.
texture
Index of the texture that is to be used for this object or -1 for none. For a more detailed description have a look at the text about wall objects.
texx1, texy1, texx2, texy2 (optional)
The part of the texture that is to be used. For a more detailed description have a look at the text about wall objects.
After setting up these variables you have to call Create2D() once to initialize the billboard object. And as usual you need Step() and Destroy() in the corresponding events.
In the part of this documentation for advanced users you will find out that arbitrary models can be handled as primitives. But currently you do not know about this so polygon objects are the most complex primitive objects you get to know. Before telling you what a polygon object is I'm going to explain what the term vertex means. A vertex is a point in 3D space, with a texture coordinate, that's part of a 3D object. A triangle is always made up of three vertices and every 3D object is made up of a couple of triangles. So one could call vertices the smallest unit of 3D objects.
Polygons do not get defined by a couple of variables. Instead you call three functions. You need an instance of an object for every polygon object. The first function you have to call is called BeginPolygon(...). It tells Ultimate 3D that you want to create a polygon object and it prepares everything. Here's the description of the function:
BeginPolygon(
VertexNumber
) |
|---|
VertexNumber
The number of vertices the polygon you are about to create will have. The value of this variable should always be bigger than or equal to three, otherwise you will not get a real polygon.
After calling BeginPolygon(...) you have to call AddVertex(...) multiple times depending on the value you passed to BeginPolygon(...). Here's the description of AddVertex(...):
AddVertex(
X,Y,Z,
U,V
) |
|---|
X, Y, Z
The position of the vertex. Note that this position gets transformed depending on the values you have set up for x, y, z, scalx/y/z and rotx/y/z. So the position is given in object space.
U, V
The texture coordinate of the vertex. To get a detailed description of what a texture coordinate is have a look at the description of the variables texx1 and texy1 of wall objects.
When you have called AddVertex(...) often enough you can call CreatePolygon() to create the polygon object. As with every other primitive object it has the texture variable and the transformation variables (for more information have a look at the description of wall objects and at the text about transforming primitives). For this reason you have to put Step() into the step event again and Destroy() into the destroy event.
Here's a code example that demonstrates how to create a simple polygon object:
BeginPolygon(5);
|
|---|
This picture shows the result of these function calls:

Any single vertex of polygon objects can be changed after the creation of the polygon. To do this there are two functions: one to get data about the polygon object, and one to change the data of the polygon object. Here's a description of both of them:
This function retrieves data about the polygon object that calls the function. It can be called after CreatePolygon().
GetVertex(
VertexIndex,
ElementIndex
) |
|---|
VertexIndex
This parameter identifies the vertex you want to get information about. The vertex that has been added to the polygon first has the index 0. The highest valid index is VertexNumber-1.
ElementIndex
This parameter tells Ultimate 3D what kind of information is to be retrieved. Here's the meaning of every value:
0 = X;
1 = Y;
2 = Z;
3 = U;
4 = V
This function changes the data of one vertex within a polygon object that calls the function. It can be called after CreatePolygon().
SetVertex(
VertexIndex,
X,Y,Z,
U,V
) |
|---|
VertexIndex
This parameter identifies the vertex whose information you want to change. The vertex that has been added to the polygon first has the index 0. The highest valid index is VertexNumber-1.
X, Y, Z
The position of the vertex. For more information have a look at the description of the function AddVertex().
U, V
The texture coordinate of the vertex. To get a detailed description of what a texture coordinate is, have a look at the description of the variables texx1 and texy1 of wall objects.
That's all you need to modify the geometry of a polygon. Here's an example for this. If placed in the step event of the polygon object it moves the third vertex up a bit in every step.
SetVertex(2, GetVertex(2,0), GetVertex(2,1)+0.1, GetVertex(2,2), GetVertex(2,3), GetVertex(2,4)); |
|---|
In its simplest case, changing the material of an object means changing its color. To do this Ultimate 3D offers a very simple function:
This function changes the material of the primitive object that calls it.
SetMaterial(
Red,
Green,
Blue,
Alpha
) |
|---|
Red, Green, Blue
These parameters define the new color that is to be used. The values for the parameters can be in the range from 0 to 255. (0|0|0) means black and (255|255|255) means white.
Alpha
This parameter gives the opacity of the object. It can be in the range from 0 to 255. 0 means no opacity (fully transparent) and 255 means fully opaque.
This function changes the emissive part of the material. The emissive part of a material is not influenced by lighting. A good example for a material that should use emissive lighting is a TV screen. It emits light so its brightness does not depend on the light. You can also use emissive materials if you do not want objects to be influenced by the light. For example, it usually looks quite weird if billboards are influenced by light.
SetMaterialEmissive(
Red,
Green,
Blue
) |
|---|
Red, Green, Blue
The color that is to be used for the emissive part of the material. Again the values can be in the range from 0 to 255.
You already know that you can change the transformation of a primitive after its creation using the variables x, y, z, rotx/y/z, scalx/y/z. The same can be done with the texture. It can be changed at any time. But what about the other properties of a primitive? For example, if you want to animate a texture by changing texx1, texy1, texx2 and texy2? If you change these variables after creating the primitive, the object does not change. For this reason there's the function RecreatePrimitive(). It does exactly what the name says. It destroys the primitive and recreates it with the new data of the variables.
© Christoph Peters. Some rights reserved.